The edges of an area rug are its unsung heroes. They are the first line of defense against the daily onslaught of foot traffic, vacuum cleaners, and the general chaos of a busy home. Over time, this constant wear and tear can cause the original binding to fray, unravel, and come loose, making your beautiful rug look tired and tattered. A frayed edge is more than just a cosmetic issue; it's a structural problem that can lead to the entire rug unraveling if left unchecked.
Before you get a quote for an expensive professional repair, know that for many common types of area rugs, re-binding the edge is a surprisingly simple and incredibly satisfying DIY project. With a few inexpensive materials and a little bit of patience, you can give your rug a clean, durable, and professional-looking new edge. This is your step-by-step guide to restoring your rug's edge to its former glory.

When to DIY vs. When to Call a Pro
This DIY method is perfect for most machine-made, tufted, or low-pile area rugs with a simple serged or taped edge.
However, you should not attempt this on:
-
Hand-knotted rugs: The edges of these rugs (the selvedges) are an integral part of their structure. A home repair can cause irreversible damage.
-
Valuable antique or heirloom rugs: Always entrust these pieces to a professional rug restoration expert.
-
Rugs with extensive damage: If the fraying has caused significant portions of the rug's pile to unravel, a professional will be needed to re-weave the damaged area.
Step 1: Gather Your Binding Toolkit
You can find all the necessary supplies at your local hardware or craft store.
-
Rug Binding Tape: This is a specialty product, often called "Instabind." It's a durable, pre-stitched tape that comes in various colors and textures. Choose a color that matches or complements your rug.
-
A High-Temperature Hot Glue Gun: This is the key to a strong, lasting bond.
-
Plenty of Hot Glue Sticks.
-
Heavy-Duty, Sharp Scissors: For cutting the old binding and the new tape.
-
Pliers: For removing any stubborn old staples or threads.
-
A Vacuum Cleaner.
The Step-by-Step Re-Binding Process
For large area rugs, this process is easier with a second person to help hold and position the rug.
1. Prep the Patient: Remove the Old Binding Lay your rug out on a clean, flat surface. Using your sharp scissors, carefully cut away all of the old, frayed binding. Get as close to the rug's edge as you can without cutting into the main pile. Use your pliers to pull out any remaining threads or staples. Once the old binding is gone, give the edge a thorough vacuuming to remove any loose debris.
2. Measure and Cut Your New Binding Unroll your new rug binding tape along the edge you are repairing. Cut a length that is about 2-3 inches longer than the side of the rug. This extra length will be used to create a clean, folded corner.
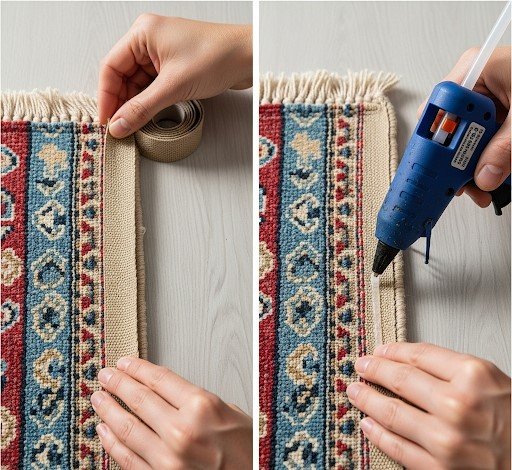
3. Apply the Glue Starting at one corner, apply a thick, continuous bead of hot glue directly into the seam of the binding tape. Work in small sections of about 12-18 inches at a time. The glue cools quickly, so you need to work efficiently.
4. Press and Secure Immediately after applying the glue to a section, press the binding firmly onto the edge of the rug. The decorative, stitched part of the tape should be on the top side of the rug, and the flat part should wrap around to the back. Squeeze the edge firmly for several seconds to ensure a strong bond between the tape, the glue, and the rug.
5. Create a Clean Corner When you reach a corner, continue the binding tape about one inch past the edge. Make a small, 45-degree diagonal cut into the bottom flap of the tape only. This will allow you to fold the tape around the corner neatly without any bunching. Apply glue, press the corner firmly, and continue down the next side.
6. Finish the Job When you have bound the entire rug and are back at your starting point, overlap the binding tape by about one inch. Cut off the excess, apply a final bead of glue, and press the end firmly in place to create a seamless finish.
Conclusion: A Fresh Start for Your Floor
A frayed edge can make even the most beautiful rug look neglected. With this simple and affordable DIY fix, you can stop the unraveling, protect your investment, and give your area rugs a crisp, clean, and incredibly durable new border. It’s a satisfying project that will make you look at your old rug with a new sense of pride.
Les bords d'un tapis sont ses héros méconnus. Ils constituent la première ligne de défense contre l'assaut quotidien du passage, des aspirateurs et du chaos général d'une maison animée. Avec le temps, cette usure constante peut faire en sorte que la bordure d'origine s'effiloche, se défasse et se détache, donnant à votre magnifique tapis un aspect fatigué et en lambeaux. Un bord effiloché est plus qu'un simple problème esthétique ; c'est un problème structurel qui peut entraîner le dénouement de tout le tapis s'il n'est pas traité.
Avant de demander un devis pour une réparation professionnelle coûteuse, sachez que pour de nombreux types courants de tapis, refaire la bordure est un projet de bricolage étonnamment simple et incroyablement satisfaisant. Avec quelques matériaux peu coûteux et un peu de patience, vous pouvez donner à votre tapis une nouvelle bordure propre, durable et d'aspect professionnel. Voici votre guide étape par étape pour redonner à la bordure de votre tapis sa gloire d'antan.
Quand le faire soi-même et quand appeler un pro
Cette méthode de bricolage est parfaite pour la plupart des tapis fabriqués à la machine, touffetés ou à poils ras avec un simple bord surjeté ou galonné.
Cependant, vous ne devriez pas tenter cela sur :
-
Les tapis noués à la main : Les bords de ces tapis (les lisières) font partie intégrante de leur structure. Une réparation à domicile peut causer des dommages irréversibles.
-
Les tapis anciens ou de famille de valeur : Confiez toujours ces pièces à un expert en restauration de tapis professionnel.
-
Les tapis très endommagés : Si l'effilochage a provoqué le dénouement de portions importantes du velours du tapis, un professionnel sera nécessaire pour retisser la zone endommagée.
Étape 1 : Rassemblez votre trousse à outils de bordure
Vous pouvez trouver toutes les fournitures nécessaires dans votre quincaillerie ou votre magasin de loisirs créatifs local.
-
Galon pour tapis : C'est un produit spécialisé, souvent appelé « Instabind ». C'est une bande durable et pré-cousue qui existe en différentes couleurs et textures. Choisissez une couleur qui correspond ou complète votre tapis.
-
Un pistolet à colle chaude haute température : C'est la clé d'une liaison solide et durable.
-
Beaucoup de bâtons de colle chaude.
-
Des ciseaux robustes et bien aiguisés : Pour couper l'ancienne bordure et le nouveau galon.
-
Une pince : Pour enlever les agrafes ou les fils tenaces.
-
Un aspirateur.
Le processus de réfection de la bordure étape par étape
Pour les grands tapis, ce processus est plus facile avec une deuxième personne pour aider à tenir et à positionner le tapis.
1. Préparation de la pièce : Retirez l'ancienne bordure Étalez votre tapis sur une surface propre et plane. À l'aide de vos ciseaux bien aiguisés, coupez soigneusement toute l'ancienne bordure effilochée. Rapprochez-vous le plus possible du bord du tapis sans couper dans le velours principal. Utilisez votre pince pour retirer les fils ou les agrafes restants. Une fois l'ancienne bordure enlevée, passez un bon coup d'aspirateur sur le bord pour enlever tous les débris.
2. Mesurez et coupez votre nouvelle bordure Déroulez votre nouveau galon pour tapis le long du bord que vous réparez. Coupez une longueur d'environ 5 à 7 cm plus longue que le côté du tapis. Cette longueur supplémentaire sera utilisée pour créer un coin propre et plié.
3. Appliquez la colle En commençant par un coin, appliquez un cordon de colle chaude épais et continu directement dans la couture du galon. Travaillez par petites sections d'environ 30 à 45 cm à la fois. La colle refroidit rapidement, vous devez donc travailler efficacement.
4. Pressez et fixez Immédiatement après avoir appliqué la colle sur une section, pressez fermement la bordure sur le bord du tapis. La partie décorative et cousue du galon doit se trouver sur le dessus du tapis, et la partie plate doit s'enrouler autour du dos. Serrez fermement le bord pendant plusieurs secondes pour assurer une liaison solide entre le galon, la colle et le tapis.
5. Créez un coin propre Lorsque vous atteignez un coin, continuez le galon d'environ 2,5 cm au-delà du bord. Faites une petite coupe diagonale à 45 degrés dans le rabat inférieur du galon uniquement. Cela vous permettra de plier le galon proprement autour du coin sans qu'il ne fasse de paquets. Appliquez de la colle, pressez fermement le coin et continuez sur le côté suivant.
6. Terminez le travail Lorsque vous avez bordé tout le tapis et que vous êtes de retour à votre point de départ, superposez le galon d'environ 2,5 cm. Coupez l'excédent, appliquez un dernier cordon de colle et pressez fermement l'extrémité en place pour créer une finition sans couture.
Conclusion : Un nouveau départ pour votre sol
Un bord effiloché peut donner un air négligé même au plus beau des tapis. Avec cette solution de bricolage simple et abordable, vous pouvez arrêter le dénouement, protéger votre investissement et donner à vos tapis une nouvelle bordure nette, propre et incroyablement durable. C'est un projet satisfaisant qui vous fera regarder votre vieux tapis avec un nouveau sentiment de fierté.
Los bordes de una alfombra son sus héroes anónimos. Constituyen la primera línea de defensa contra el asalto diario del tránsito, las aspiradoras y el caos general de un hogar ajetreado. Con el tiempo, este desgaste constante puede hacer que el borde original se deshilache, se deshaga y se desprenda, dando a tu magnífica alfombra un aspecto cansado y andrajoso. Un borde deshilachado es más que un simple problema estético; es un problema estructural que puede llevar a que toda la alfombra se deshaga si no se trata.
Antes de pedir un presupuesto para una reparación profesional costosa, debes saber que para muchos tipos comunes de alfombras, rehacer el borde es un proyecto de bricolaje sorprendentemente simple e increíblemente satisfactorio. Con unos pocos materiales económicos y un poco de paciencia, puedes darle a tu alfombra un borde nuevo, limpio, duradero y de aspecto profesional. Aquí tienes tu guía paso a paso para devolverle al borde de tu alfombra su antiguo esplendor.
Cuándo hacerlo tú mismo y cuándo llamar a un profesional
Este método de bricolaje es perfecto para la mayoría de las alfombras hechas a máquina, tufted o de pelo corto con un simple borde sobrehilado o ribeteado.
Sin embargo, no deberías intentarlo en:
-
Alfombras anudadas a mano: Los bordes de estas alfombras (los orillos) son una parte integral de su estructura. Una reparación casera puede causar daños irreversibles.
-
Alfombras antiguas o de gran valor familiar: Confía siempre estas piezas a un experto en restauración de alfombras profesional.
-
Alfombras muy dañadas: Si el deshilachado ha provocado que se deshagan porciones importantes del pelo de la alfombra, se necesitará un profesional para retejer la zona dañada.
Paso 1: Reúne tu kit de herramientas para el borde
Puedes encontrar todos los suministros necesarios en tu ferretería o tienda de manualidades local.
-
Cinta para ribetear alfombras: Es un producto especializado, a menudo llamado «Instabind». Es una cinta duradera y pre-cosida que viene en varios colores y texturas. Elige un color que combine o complemente tu alfombra.
-
Una pistola de pegamento caliente de alta temperatura: Es la clave para una unión fuerte y duradera.
-
Muchas barras de pegamento caliente.
-
Tijeras resistentes y bien afiladas: Para cortar el borde antiguo y la nueva cinta.
-
Unos alicates: Para quitar grapas o hilos rebeldes.
-
Una aspiradora.
El proceso de rehacer el borde paso a paso
Para las grandes alfombras, este proceso es más fácil con una segunda persona para ayudar a sostener y posicionar la alfombra.
1. Preparación de la pieza: Retira el borde antiguo Extiende tu alfombra sobre una superficie limpia y plana. Con tus tijeras bien afiladas, corta con cuidado todo el borde antiguo y deshilachado. Acércate lo más posible al borde de la alfombra sin cortar el pelo principal. Usa tus alicates para quitar los hilos o grapas restantes. Una vez retirado el borde antiguo, pasa bien la aspiradora por el borde para eliminar todos los residuos.
2. Mide y corta tu nuevo borde Desenrolla tu nueva cinta para ribetear alfombras a lo largo del borde que estás reparando. Corta una longitud de aproximadamente 5 a 7 cm más larga que el lado de la alfombra. Esta longitud extra se utilizará para crear una esquina limpia y doblada.
3. Aplica el pegamento Comenzando en una esquina, aplica un cordón de pegamento caliente grueso y continuo directamente en la costura de la cinta. Trabaja en pequeñas secciones de unos 30 a 45 cm a la vez. El pegamento se enfría rápidamente, por lo que debes trabajar de manera eficiente.
4. Presiona y fija Inmediatamente después de aplicar el pegamento en una sección, presiona firmemente el borde sobre el borde de la alfombra. La parte decorativa y cosida de la cinta debe quedar en la parte superior de la alfombra, y la parte plana debe envolver la parte posterior. Aprieta firmemente el borde durante varios segundos para asegurar una unión sólida entre la cinta, el pegamento y la alfombra.
5. Crea una esquina limpia Cuando llegues a una esquina, continúa con la cinta unos 2,5 cm más allá del borde. Haz un pequeño corte diagonal de 45 grados solo en la solapa inferior de la cinta. Esto te permitirá doblar la cinta limpiamente alrededor de la esquina sin que se amontone. Aplica pegamento, presiona firmemente la esquina y continúa por el siguiente lado.
6. Termina el trabajo Cuando hayas ribeteado toda la alfombra y hayas vuelto al punto de partida, superpón la cinta unos 2,5 cm. Corta el exceso, aplica un último cordón de pegamento y presiona firmemente el extremo en su lugar para crear un acabado sin costuras.
Conclusión: Un nuevo comienzo para tu suelo
Un borde deshilachado puede dar un aspecto descuidado incluso a la alfombra más hermosa. Con esta solución de bricolaje simple y asequible, puedes detener el deshilachado, proteger tu inversión y dar a tus alfombras un borde nuevo, nítido, limpio e increíblemente duradero. Es un proyecto satisfactorio que te hará mirar tu vieja alfombra con un nuevo sentimiento de orgullo.