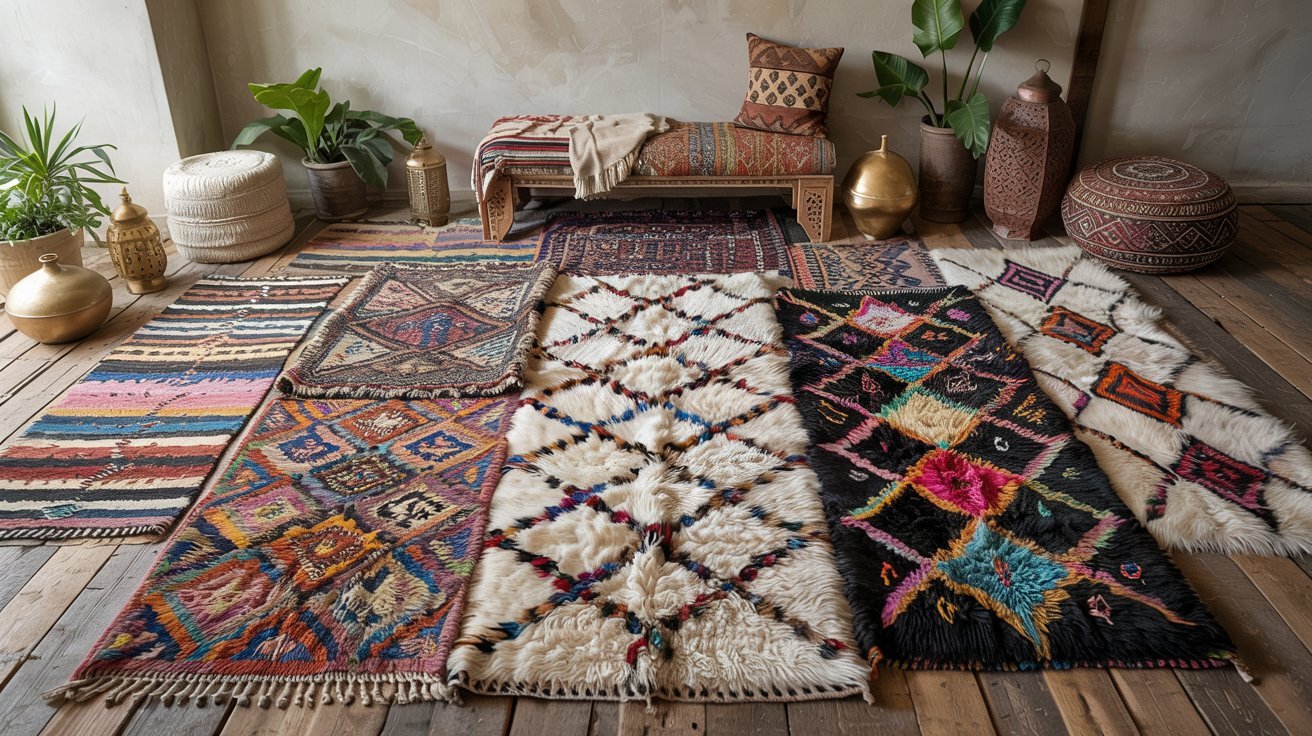
Spring is in the air. It’s that time of year when we throw open the windows, clear out the clutter, and crave a fresh, clean start for our homes. While you’re dusting the shelves and washing the curtains, don’t forget the biggest surface in your room: the area rug. After a long winter of trapping dust, dirt, and allergens, your rug is likely desperate for a deep clean.
For certain types of rugs, a professional-level clean is a surprisingly simple and incredibly satisfying DIY project you can do right in your own backyard. Washing a rug outdoors is the ultimate reset, flushing out a season's worth of grime and leaving it bright, fresh, and truly clean. But before you grab the hose, it's crucial to know which rugs can handle a bath and which ones will be ruined by it. This is your complete tutorial for safely and effectively washing your rug outdoors.

The Golden Rule: Know Your Rug's Material
This is the most important part of this guide. This outdoor washing method is only safe for certain types of durable, water-resistant rugs.
For any of the rugs on the "do not wash" list, your only safe option is a professional area rug cleaning service.
Step 1: Gather Your Cleaning Supplies
You don't need much for this project.
-
A clean, flat, sloped surface (like a clean driveway or patio)
-
A garden hose with a spray nozzle
-
A mild, pH-neutral detergent (clear dish soap or a specialized rug shampoo)
-
A soft-bristled brush
-
A floor squeegee
-
Two sturdy sawhorses, a clean deck railing, or a set of patio chairs for drying
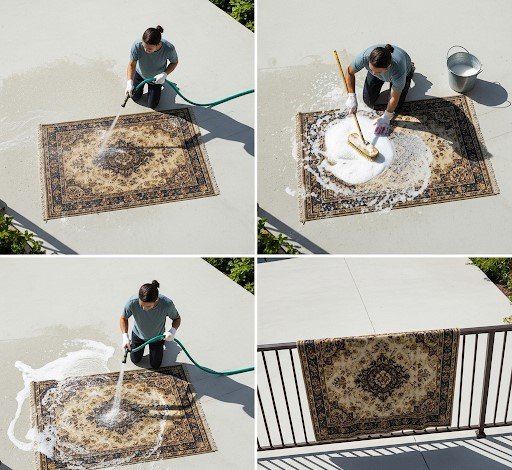
The Step-by-Step Washing Process
1. The Pre-Wash Prep Before you get the rug wet, you need to remove all the loose dirt. Give the rug a thorough vacuuming on both the front and the back. For a really deep clean, hang the rug over a railing and use a broom handle to beat the back of it, dislodging the deep-seated grit.
2. The Spot Test In a small bowl, mix your mild detergent with water. Find an inconspicuous corner of your rug and test the solution to make sure the colors don't bleed. Apply a little bit of the soapy water, wait a minute, and then blot it with a clean, white cloth. If any color transfers to the cloth, stop immediately.
3. The Initial Rinse Lay the rug flat on your clean, sloped surface and use the hose to completely saturate it with water.
4. The Gentle Scrub Pour your diluted cleaning solution onto the rug. Take your soft-bristled brush and work the solution into a lather, moving in the direction of the pile. Pay extra attention to any heavily soiled or stained areas.
5. The Thorough Rinse This is a critical step. Use your hose to rinse the rug completely. Continue rinsing until the water runs completely clear and there are no more soap suds. Any soap residue left behind will attract more dirt and leave your rug feeling stiff and sticky.
6. Squeegee the Excess Water Take your floor squeegee and, moving in the direction of the pile, push as much excess water out of the rug as you possibly can. This will significantly speed up the drying time.
7. The All-Important Drying Stage Drape your wet rug over your sawhorses, railing, or chairs. It is crucial that air can circulate on both sides of the rug to prevent mildew. Let it dry completely in the sun. This may take a full day or two, depending on the weather. Flip the rug over halfway through the process to ensure the back is also completely dry.
Conclusion: A Fresh Foundation for the Season
For the right type of rug, an outdoor wash is the ultimate spring cleaning ritual. It’s a satisfying and effective way to flush out the grime of the past season and bring a fresh, clean foundation back into your home. By knowing your materials and following these simple steps, you can safely give your durable area rugs the deep clean they deserve.
Le printemps est dans l'air. C'est le moment de l'année où nous ouvrons grand les fenêtres, nous débarrassons du désordre et aspirons à un nouveau départ frais pour nos maisons. Pendant que vous époussetez les étagères et lavez les rideaux, n'oubliez pas la plus grande surface de votre pièce : le tapis. Après un long hiver à emprisonner la poussière, la saleté et les allergènes, votre tapis a probablement désespérément besoin d'un nettoyage en profondeur.
Pour certains types de tapis, un nettoyage de niveau professionnel est un projet de bricolage étonnamment simple et incroyablement satisfaisant que vous pouvez faire directement dans votre jardin. Laver un tapis à l'extérieur est la remise à zéro ultime, éliminant la crasse d'une saison et le laissant brillant, frais et vraiment propre. Mais avant de prendre le tuyau d'arrosage, il est crucial de savoir quels tapis peuvent supporter un bain et lesquels seront ruinés par celui-ci. Voici votre tutoriel complet pour laver votre tapis à l'extérieur en toute sécurité et efficacement.
La Règle d'Or : Connaissez le Matériau de Votre Tapis
C'est la partie la plus importante de ce guide. Cette méthode de lavage en extérieur est uniquement sans danger pour certains types de tapis durables et résistants à l'eau.
Pour tous les tapis de la liste « à ne pas laver », votre seule option sûre est un service de nettoyage de tapis professionnel.
Étape 1 : Rassemblez Votre Matériel de Nettoyage
Vous n'avez pas besoin de grand-chose pour ce projet.
-
Une surface propre, plane et en pente (comme une allée ou une terrasse propre)
-
Un tuyau d'arrosage avec un pistolet pulvérisateur
-
Un détergent doux au pH neutre (du savon à vaisselle transparent ou un shampoing spécialisé pour tapis)
-
Une brosse à poils souples
-
Une raclette de sol
-
Deux solides tréteaux, une rampe de terrasse propre ou un ensemble de chaises de patio pour le séchage
Le Processus de Lavage Étape par Étape
1. La Préparation Avant le Lavage Avant de mouiller le tapis, vous devez enlever toute la saleté meuble. Passez un bon coup d'aspirateur sur le tapis, à l'avant et à l'arrière. Pour un nettoyage vraiment en profondeur, suspendez le tapis sur une rampe et utilisez un manche à balai pour battre le dos, délogeant ainsi la saleté incrustée.
2. Le Test sur une Petite Zone Dans un petit bol, mélangez votre détergent doux avec de l'eau. Trouvez un coin discret de votre tapis et testez la solution pour vous assurer que les couleurs не dégorgent pas. Appliquez un peu d'eau savonneuse, attendez une minute, puis épongez avec un chiffon blanc et propre. Si une couleur se transfère sur le chiffon, arrêtez immédiatement.
3. Le Rinçage Initial Étalez le tapis à plat sur votre surface propre et en pente et utilisez le tuyau d'arrosage pour le saturer complètement d'eau.
4. Le Brossage Doux Versez votre solution de nettoyage diluée sur le tapis. Prenez votre brosse à poils souples et faites mousser la solution en vous déplaçant dans le sens du poil. Portez une attention particulière aux zones très sales ou tachées.
5. Le Rinçage Approfondi C'est une étape cruciale. Utilisez votre tuyau d'arrosage pour rincer complètement le tapis. Continuez à rincer jusqu'à ce que l'eau soit complètement claire et qu'il n'y ait plus de mousse de savon. Tout résidu de savon laissé derrière attirera plus de saleté et laissera votre tapis raide et collant.
6. Essorez l'Excès d'Eau Prenez votre raclette de sol et, en vous déplaçant dans le sens du poil, poussez autant d'eau que possible hors du tapis. Cela accélérera considérablement le temps de séchage.
7. L'Étape Cruciale du Séchage Drapez votre tapis mouillé sur vos tréteaux, votre rampe ou vos chaises. Il est crucial que l'air puisse circuler des deux côtés du tapis pour éviter la moisissure. Laissez-le sécher complètement au soleil. Cela peut prendre un jour ou deux, selon le temps. Retournez le tapis à mi-parcours pour vous assurer que le dos est également complètement sec.
Conclusion : Une Base Fraîche pour la Saison
Pour le bon type de tapis, un lavage en extérieur est le rituel ultime du nettoyage de printemps. C'est un moyen satisfaisant et efficace d'éliminer la crasse de la saison passée et de ramener une base fraîche et propre dans votre maison. En connaissant vos matériaux et en suivant ces étapes simples, vous pouvez donner en toute sécurité à vos tapis durables le nettoyage en profondeur qu'ils méritent.
La primavera está en el aire. Es esa época del año en la que abrimos las ventanas de par en par, nos deshacemos del desorden y anhelamos un nuevo comienzo fresco para nuestros hogares. Mientras desempolvas los estantes y lavas las cortinas, no te olvides de la superficie más grande de tu habitación: la alfombra. Después de un largo invierno atrapando polvo, suciedad y alérgenos, tu alfombra probablemente necesita desesperadamente una limpieza profunda.
Para ciertos tipos de alfombras, una limpieza de nivel profesional es un proyecto de bricolaje sorprendentemente simple e increíblemente satisfactorio que puedes hacer directamente en tu jardín. Lavar una alfombra al aire libre es el reinicio definitivo, eliminando la suciedad de una temporada y dejándola brillante, fresca y verdaderamente limpia. Pero antes de coger la manguera, es crucial saber qué alfombras pueden soportar un baño y cuáles se arruinarán. Aquí tienes tu tutorial completo para lavar tu alfombra al aire libre de forma segura y eficaz.
La Regla de Oro: Conoce el Material de Tu Alfombra
Esta es la parte más importante de esta guía. Este método de lavado al aire libre es únicamente seguro para ciertos tipos de alfombras duraderas y resistentes al agua.
Para todas las alfombras de la lista «no lavar», tu única opción segura es un servicio de limpieza de alfombras profesional.
Paso 1: Reúne tu Material de Limpieza
No necesitas mucho para este proyecto.
-
Una superficie limpia, plana e inclinada (como una entrada de coche o una terraza limpia)
-
Una manguera de jardín con una boquilla pulverizadora
-
Un detergente suave de pH neutro (jabón lavavajillas transparente o un champú especializado para alfombras)
-
Un cepillo de cerdas suaves
-
Un escurridor de suelo
-
Dos caballetes resistentes, una barandilla de terraza limpia o un conjunto de sillas de patio para el secado
El Proceso de Lavado Paso a Paso
1. La Preparación Antes del Lavado Antes de mojar la alfombra, debes eliminar toda la suciedad suelta. Aspira bien la alfombra, por delante y por detrás. Para una limpieza realmente profunda, cuelga la alfombra en una barandilla y usa un palo de escoba para golpear la parte trasera, desalojando así la suciedad incrustada.
2. La Prueba en una Zona Pequeña En un bol pequeño, mezcla tu detergente suave con agua. Encuentra una esquina discreta de tu alfombra y prueba la solución para asegurarte de que los colores no destiñan. Aplica un poco de agua jabonosa, espera un minuto y luego seca con un paño blanco y limpio. Si algún color se transfiere al paño, detente de inmediato.
3. El Aclarado Inicial Extiende la alfombra sobre tu superficie limpia e inclinada y usa la manguera para saturarla completamente de agua.
4. El Cepillado Suave Vierte tu solución de limpieza diluida sobre la alfombra. Coge tu cepillo de cerdas suaves y haz espuma con la solución moviéndote en la dirección del pelo. Presta especial atención a las zonas muy sucias o manchadas.
5. El Aclarado a Fondo Este es un paso crucial. Usa la manguera para aclarar completamente la alfombra. Sigue aclarando hasta que el agua salga completamente clara y no queden restos de espuma de jabón. Cualquier residuo de jabón que quede atraerá más suciedad y dejará la alfombra rígida y pegajosa.
6. Escurre el Exceso de Agua Coge tu escurridor de suelo y, moviéndote en la dirección del pelo, empuja toda el agua que puedas fuera de la alfombra. Esto acelerará considerablemente el tiempo de secado.
7. La Etapa Crucial del Secado Cuelga tu alfombra mojada sobre tus caballetes, barandilla o sillas. Es crucial que el aire pueda circular por ambos lados de la alfombra para evitar el moho. Déjala secar completamente al sol. Esto puede tardar uno o dos días, dependiendo del tiempo. Dale la vuelta a la alfombra a mitad del proceso para asegurarte de que la parte trasera también esté completamente seca.
Conclusión: Una Base Fresca para la Temporada
Para el tipo de alfombra adecuado, un lavado al aire libre es el ritual definitivo de la limpieza de primavera. Es una forma satisfactoria y eficaz de eliminar la suciedad de la temporada pasada y devolver una base fresca y limpia a tu hogar. Conociendo tus materiales y siguiendo estos sencillos pasos, puedes dar con seguridad a tus alfombras duraderas la limpieza profunda que se merecen.